Stringing: A Common FDM Issue
In the realm of 3D printing, ‘stringing’ is one issue all users will eventually run into, turning your beautiful 3D prints into a web of frustration and disappointment. If you’ve ever encountered those unwanted, wispy strands of filament spanning across your print, you’re not alone. Stringing issues are a common problem in the world of additive manufacturing, plaguing both hobbyists and experienced users alike.
Imagine this: you’ve spent hours working on the perfect 3D model, optimizing every last setting on your printer & slicing software, eagerly waiting for the moment when your print is complete. But instead of a flawless masterpiece, you find thin, unwanted strings clinging to your object, as if a spider has made its home inside your printer’s toolhead and spun a web of plastic across your print. These strings are the unmistakable symptom of a stringing issue, and they can be a source of immense frustration.
In this comprehensive guide, we’ll explore the common symptoms that users may observe when dealing with this problem and equip you with the knowledge and techniques to eliminate those pesky strings from your prints. Whether you’re a 3D printing enthusiast looking to enhance your skills or a newcomer seeking to overcome the challenges of stringing, this article is your roadmap to achieving cleaner, smoother, and more precise 3D prints.
Recognizing the Symptoms of Stringing
Stringing issues in 3D printing often make themselves known through a series of distinct symptoms covered below. By understanding these signs, you can pinpoint whether your 3D printer is experiencing stringing and take the necessary steps to address it.
Wispy Filament Strands Between Printed Features
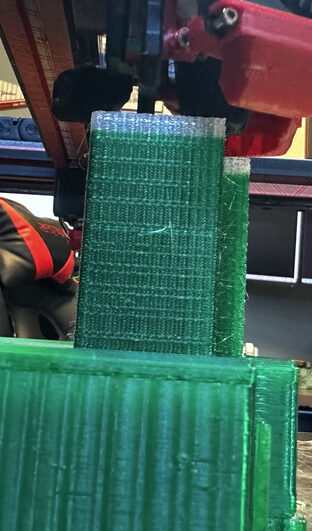
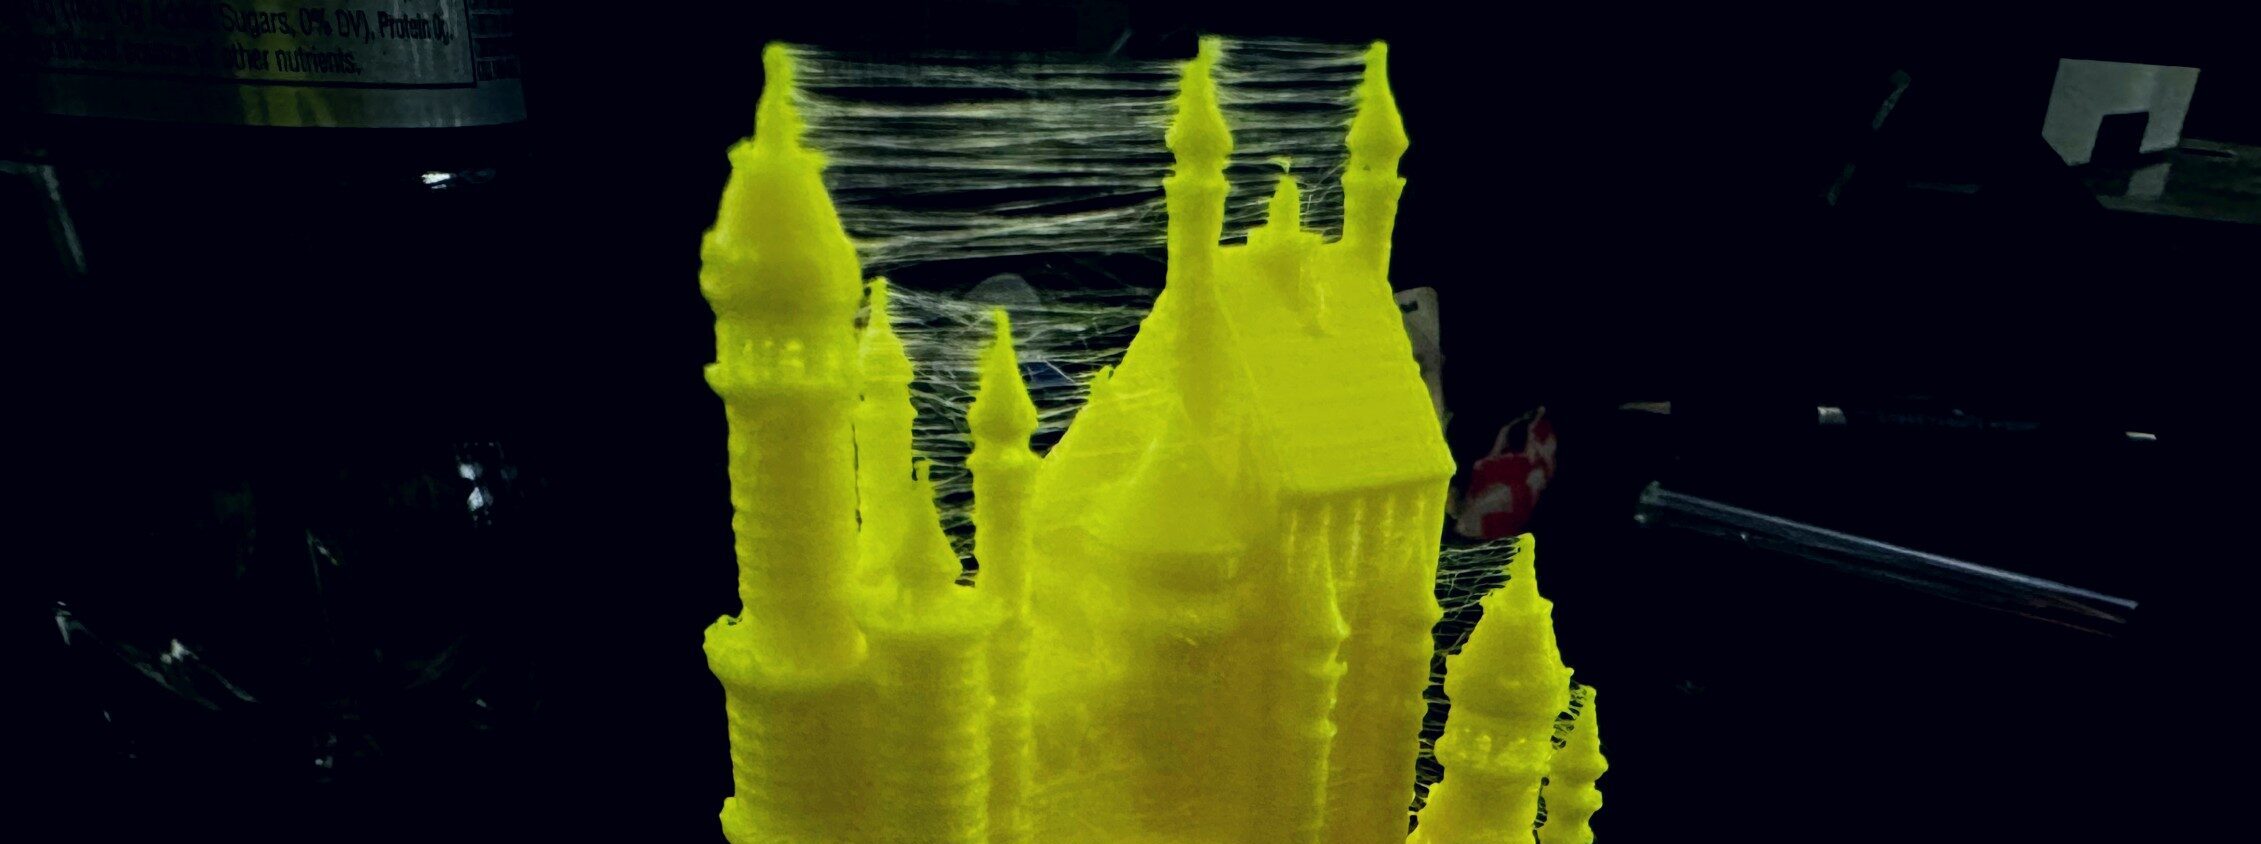
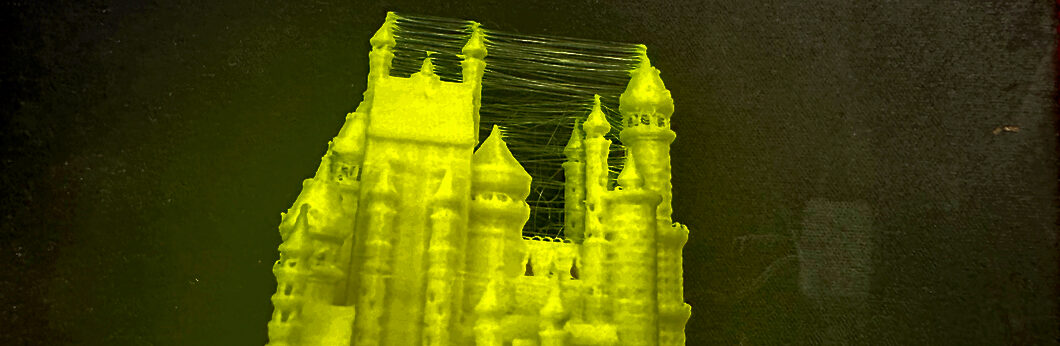
The most obvious indicator of a stringing issue is the presence of thin, thread-like plastic bridging gaps between parts of your print. These strings can appear anywhere on the object, but they are most commonly found between support structures, across the top of arches, or connecting the infill.
Rough, Uneven, & Hairy Surface Finish
Stringing often leads to an imperfect surface finish on your prints, through the accumulation of small filament “hairs” or blobs on the print. You may notice that the exterior of your objects appear rougher than expected. These hairs can obscure fine details and compromise the overall quality of your prints.
Reduced Print Accuracy & Precision
Stringing will ultimately impact the accuracy and precision of your 3D prints. Objects which should fit together seamlessly may have deformities outside your expected dimensional tolerance due to the presence of strings, leading to misalignments and poor assembly quality.
Understanding the Causes of Stringing
Understanding the root cause of your stringing issue will be a valuable tool as you work to fix it. Once you’re informed on the mechanisms behind the issue, you’ll be better equipped to make informed adjustments to your printer & slicer settings:
Temperature Settings
Temperature-related stringing will occur when the nozzle temperature is too high, causing the filament to remain molten even when the extruder is not actively depositing material. The melted filament can manifest itself as stringing on your model by two different mechanisms. First, the melt will ‘ooze’ out of your hotend when traveling, leaving behind the characteristic ‘strings’. Second, your extruder will be unable to retract melted filament effectively, producing even more ooze.
Retraction Settings
Retraction is the process by which the extruder pulls the filament slightly backward when traveling between different parts of the print (and not actively printing). Inadequate retraction, or the absence of it altogether, can allow melted filament to ooze out of the nozzle when it should be idle, resulting in those bothersome strings. Conversely, excessive retraction can cause filament to be pulled back too aggressively, leading to air gaps in the print and poor layer adhesion.
Layer Cooling
When the cooling fan is not operating optimally or is set at too low a speed, the deposited layers of filament may not cool down quickly enough to solidify correctly. If the toolhead goes to move before the previous layer has cooled, excess filament is pulled along and stringing between different parts of the object.
Case Study: Fixing Stringing on the Ender 3
The Ender 3 is one of the most popular and affordable 3D printers on the market. It’s an excellent choice for beginners and experienced users alike. Below, we’ll discuss resolving stringing issues on this common printer, though many of these tips are easily transferable to other FDM printers you may be working with.
Optimize Temperature Settings
Consult Filament Manufacturer’s Recommendations
To start, focus on the nozzle temperature. Begin with the manufacturer’s recommended temperature for your filament type and make incremental adjustments. This information can usually be found on the filament spool or the manufacturer’s website. Remember that different filament brands and types may require different temperature settings
Temperature Calibration
Perform temperature calibration tests to determine the ideal nozzle temperature for the specific filament you’re using. You can do this by printing a temperature tower, which gradually changes the temperature during the print. This will help you identify the temperature at which stringing is minimized. Alternatively, consider lowering the nozzle temperature by 5-10°C from the default setting. This reduction can help reduce the tendency for filament to ooze during non-printing moves.
Real-Time Temperature Adjustment
Some 3D printers, including the Ender 3, allow you to adjust the nozzle temperature during printing. To do this, access your 3D printer’s control interface, either through the onboard screen or a connected computer. While the print is in progress, navigate to the temperature settings and make slight adjustments, typically in increments of 5°C. Monitor the print closely as you modify the nozzle temperature, looking for improvements. This real-time adjustment allows you to find the optimal temperature “sweet spot” for your specific filament and print conditions, ensuring that you get the best results without halting the print. Experiment with making temperature adjustments on the fly to observe how they affect stringing.
Fine-Tune Retraction Settings
Enable Retraction
Retraction can be alternatively enabled and managed from your slicer. Consult documentation for your specific slicer software to find these settings. Most slicing software packages come with default retraction settings, but these may need to be customized for your specific needs.
Retraction Distance
This parameter determines how much filament is pulled back into the nozzle when the printer moves between different print locations. Start by setting a conservative retraction distance, typically around 1.5 to 2.5 mm. Then, print a test object and closely monitor it. If stringing is still noticeable, iteratively increase the retraction distance in small increments, such as 0.5 mm at a time. Note: excessive retraction distance can lead to other issues like under-extrusion or filament grinding, so aim for the sweet spot that provides clean, precise prints without over-retracting.
Retraction Speed
Retraction speed controls how quickly the filament is pulled back into the nozzle during non-printing movements.s tart with a moderate retraction speed, often around 25-40 mm/s. While printing a test object, monitor closely for any signs of stringing. If the issue persists, gradually raise the retraction speed in small increments. A faster retraction speed can help minimize the time the filament spends in the hot zone, reducing the chances of oozing and string formation. However, be cautious not to set it too high, as extremely fast retraction may cause other problems like under-extrusion or filament grinding.
Utilize the Cooling Fan
The cooling fan helps to quickly solidify and cool down the extruded filament, reducing the chances of stringing during travel moves. Ensure that your cooling fan is properly connected and operational before printing. In most cases, it’s advisable to have the fan running at 100% during the entire print, especially when using PLA or similar materials that benefit from rapid cooling. However, be cautious with certain materials like ABS, which may require less cooling to prevent warping. Ensure that your cooling fan is functioning correctly and consider upgrading to a higher-quality fan for improved cooling performance.
Check Filament Quality
Filament quality also plays a vital role, as low-quality or improperly stored filaments can contain impurities that promote stringing. Always use high-quality, moisture-free filament and store it in a dry, sealed container with desiccant. Additionally, ensure your filament is compatible with your printer’s specifications. DDA recommends using Inland, Hatchbox, Sunlu, Protopasta, Zyltech when possible; our team has relied on these providers for years, and can testify to their quality and longevity.
Review and Fine-Tune Print Settings
Lastly, it’s essential to review and fine-tune your overall print settings. This includes aspects like retraction settings, print speed, layer height, and more. Keep a log of your experiments and their outcomes, allowing you to refine your settings over time for optimal results.
A valuable tool used to verify your setup once you’ve adjusted these settings is a retraction tower, a vertical column or series of columns printed alongside your main 3D model, designed to intentionally induce stringing at different retraction settings. By examining the tower after printing, you can identify which segment or settings exhibit the least amount of stringing, helping you pinpoint the optimal settings for your specific setup. This method of testing ensures that you achieve cleaner and more precise prints by minimizing stringing issues without the need for multiple test prints.
Conclusion
Stringing, though frustrating, is not an insurmountable challenge. With patience, experimentation, and the knowledge gained from this guide, you can confidently diagnose and address stringing issues, whether you’re a seasoned 3D printing enthusiast or just starting on your printing journey. Whether you’re using an Ender 3 or another 3D printer model, understanding the root causes of stringing and implementing the appropriate fixes can significantly improve your printing experience. Embrace the iterative process of fine-tuning, testing, and refining your settings, and you’ll find that the rewards of string-free 3D printing are well worth the effort.
Ultimately, this journey is not just about eliminating strings; it’s about transforming your creative visions into tangible, flawless objects. So, go forth, armed with the insights and strategies shared here, and let your 3D printer bring your ideas to life with precision, clarity, and a newfound freedom from the web of strings. If you continue to face issues on your printer, feel free to reach out to DDA Maker Tech for a free consultation – we’d be happy to het you up and running again. Happy printing!